Hi All,
First up 'Happy Jubilee Weekend' to those of us in The UK, hope you all have a great time however you celebrate!
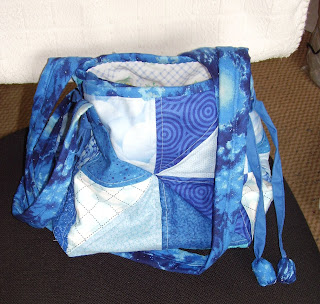
Next I have to boast! I have finished the bag started at the workshop at CTQ last week, this surely must be a record for yours truly - a project started and finished in one week, whooo hooo!! The bag is the Kona Squishy Bag from a book by by Julia Davis & Anne Muxworthy of Step by Step Patchwork at South Molton, Devon, more of these bags can be seen in their Gallery (here). I used the blue charm squares, bought at Quilts UK Malvern
Next I have to boast! I have finished the bag started at the workshop at CTQ last week, this surely must be a record for yours truly - a project started and finished in one week, whooo hooo!! The bag is the Kona Squishy Bag from a book by by Julia Davis & Anne Muxworthy of Step by Step Patchwork at South Molton, Devon, more of these bags can be seen in their Gallery (here). I used the blue charm squares, bought at Quilts UK Malvern
These were cut into 1/2 square triangles and pieced together so that no two squares are the same (in theory!!) unfortunately some of the squares in my pack were duplicated so that went outta the window, as you could see in the picture in my last post. Anyway this weeks progress has been fairly productive and I took some pictures to show you what I did.
 |
| Ties made and stitched in place |
 | ||||||||||
| Handles added |
The next step was to insert the lining, add the binding and stitch in place, this was the first time I have used a double binding for a bag and I must agree with Heather it does give a nice firm edge to the top of the bag.
Once the binding was sewn down inside the bag, I needed to make some fabric beads for the ends of the ties, now I must admit I had thought to skip this bit as it seemed quite fiddly and time consuming, but today I thought 'lets give it a try', I'll make one and see how it goes! It went very well and it looked very cute so I made the other three in less than 2 hours and took some pics to show you the process.
 | ||||
| 2" x 3" piece of fabric |
cut pieces of fabric 2" x 3" and fold them in half along the short side, R/S together and stitch, I chain pieced them on the machine to save time and make them a bit stronger.
next you need to run a gather stitch through one end and slide this tube up over the raw end of the ties so that about 1/4" of the tie protrudes.
pull up the stitches tightly and fasten off securely but do not cut your thread as you will need it again.
Pull the little tube down over itself covering the end of the tie and showing the R/S of the fabric.
Next turn in about 1/2" round the raw edge and using the thread from the other end sew a small gather stitch along the edge, then stuff the 'bead' firmly, I find using the end of my scissors helped with this!
gather up the stitches, fasten off securely and you have a fabric bead
Voila! 4 fabric beads to decorate your bag ties
 |
| and a completed bag! |
Last but by no means least we all know that I do not NEED any more fabric but on Thursday I went along to have a sewing machine serviced by Mark (he of the Huskqvarna shop) who was doing basic services for a small fee and of course being the business man he is he brought some fabric with him, now this was so that while he was working on your machine you would have something to look at and would not get bored waiting! LOL so I looked... and then I saw... this fabric which spoke to me, so in the end it actually cost me twice as much to have the service done because I bought this....8 FQ's and 2 half metres,
haven't got a clue what I will do with them but Hey!!! its sooo pretty! and it was tied with a sweet bit of ribbon which will surely come in useful for something .. wont it?
Now I am off to have another 'play' with my new machine so hopefully, I will have something else to show you next time.
Bye for now
Lorraine.


No comments:
Post a Comment